Tag Archives: classroom decor

Countdown to Christmas! {3 creative ideas}

by Diane Burdick, Ed.S

Comment on this post and be entered to win $20 to spend at The School Box  

Kids love counting down to Christmas. After all, it is one of the most exciting times of the year! But just how do you get ready for the season? If your answer is simply x-ing out the days on a calendar, might we suggest a few fun crafts to add to your classroom Christmas tradition repertoire?

Santa’s Disappearing Beard

Santa's beardThis idea, found here, is super simple to make!

1. Create a long Santa beard from lined paper (like notebook paper).

2. Add a face from construction paper.

3. Then clip off one line’s worth of the beard each day.

The shorter Santa’s beard gets, the closer you are to Christmas. Not only will kids enjoy snipping Santa’s beard, but it helps them visualize the length of time left before Christmas.

Merry Muffin Tins

merry muffin tinsMaybe instead of a traditional counting down calendar, you want give tiny gifts too. Sure, you could spend lots of money on a container, but consider repurposing something you already have around the house — a 24 count muffin tin — into the perfectly portioned gift container. Thanks to Heartland Paper for this ingenious idea!

1. Cut out circles of heavy paper (such as scrapbook paper, or cardstock covered with wrapping paper) slightly larger than the muffin tin openings.

2. Decorate each circle with a number for each day leading up to Christmas.

3. Attach a small magnet to the back of each circle, and cover each opening with the decorated circle.

4. Place a small trinket or piece of candy in each opening.

5. Display the new muffin tin calendar on the table, or tie a ribbon through the hole in the top of the tin and hang on the wall.

Chinese Takeout Containers

Chinese takeout adventIf you’re the type of person who loves to give gifts all season long, then garland made from numbered and decorated Chinese takeout containers will give you the perfect opportunity to tuck away gifts AND count down to the Big Guy’s arrival.

1. Purchase empty boxes at the craft store or online, and decorate each box with a number and bits of fabric or festive paper to make it look more Christmasy.

2. Fill each container with goodies— such as candies, freshly baked cookies, crafts or small toys.

3. Line up the containers on the fireplace mantle or clip to a piece of rope with clothespins for an enticing display.

This idea is courtesy of JustSewSassy.com. Find affordable containers in an array of colors here or here.

Any way you choose to celebrate the countdown to the most exciting day of the year, we hope you’ll find time for all the joys this season has to offer. 

3 Comments

Filed under Activities, Crafts, Holidays

best scarecrow we’ve seen all fall

Comment on this post and be entered to win a $20 School Box gift card. A winner will be drawn at the end of the month! 

Does your school hold a scarecrow-decorating contest between the classes each fall? Well, if it does, here’s a little lovely that’s sure to win the blue ribbon. And if it doesn’t, this idea will still turn your classroom into the talk of the town (or school).

Here’s the gist: rather than creating the typical man-of-straw out of a predictable flannel shirt and old jeans, why not turn your entire door into one? We love this idea from Laurie Butler.

Photo by Laurie Butler

supplies:

bulletin board paper in orange, yellow, brown and black

directions:

1. First, cut a large floppy hat from a piece of orange bulletin board paper. Don’t worry about making it perfect– lumps add a nice rumpled scarecrow touch. A band of lighter orange and a sunflower complete the fall look.

2. Next, cut several strips of yellow paper in varying lengths. Glue these under the hat to make the hair.

3. Once dry, mount the hat/hair to the door frame.

4. To make the face, add two black circle eyes and an orange triangle for a nose. Cut a wobbly, lopsided “u” shape for the mouth, and add a few “stitches” to the mouth and around the nose. Adorable!!

To finish off the decor around the door, create a wooden “fence” out of brown bulletin board paper and add a student-created pumpkin patch below. Voila! Blue ribbon, fo’ sho’.

3 Comments

Filed under Bulletin Boards, Classroom Decor, Crafts, Fall, Thanksgiving

Best Teacher Organization Ideas, Part III

by Elizabeth Cossick, M. Ed. 

Comment on this post and be entered to win a $20 School Box gift card. Just for sharing a lil’ ol’ comment. 

In this series, we’ve compiled our favorite classroom organization ideas to share with you. We shared a great idea for teacher toolboxes in the first post here. And a great idea for over-the-door shoe organizers here.

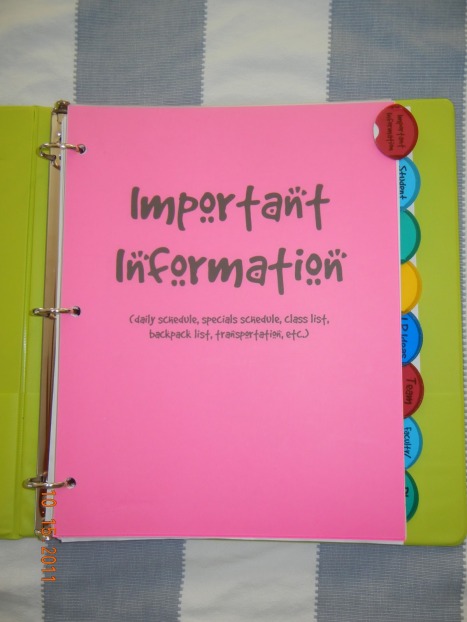
And now here’s another winner: a teacher organizational binder that will be your new BFF.

This idea is from Jenn Rivera, a third grade bilingual teacher and blogger at Beyond the Grades. Thanks, Jenn! LOVE this!

Inside pocket: a small monthly calendar book. 

TABS:

Important Information: schedules, class list, transportation. All very handy stuff for a sub.

Student Data: This section is extra handy. I keep contact information, conference times, assessment scores (important ones not all).

I use this student information sheet in my student data section. It’s from Busy Teachers Cafe. Click the link or the picture; it’ll take you directly to a downloadable pdf.

 Calendars: Curriculum calendar and testing calendar.

Grades: I keep the district’s grading requirements as well as a spreadsheet with my grades for the 9 weeks. No more grading book!

Lesson Plan Ideas: A place to keep those great lesson ideas that you hear/print/pin but haven’t incorporated, yet!

The next three sections are where I keep documentation and notes from various meetings: 

Back Pocket: I keep an EZ Grader for grading at home. {Find one here.} 

Click here for the font used on cover sheets. 

Substitute Teacher Binder

Jenn’s teacher binder is so great, we thought it would be a good idea to create a substitute teacher section or binder to accompany it. The sub binder could be kept in a separate binder or it could simply be a section all to itself within your teacher binder. And, of course, since cute is always better, we particularly favored this adorable FREE printables pack from Think-Share-Teach.

Click the picture to access a downloadable file of these cutie pages:

She also offers a pink version and a purple version. (Yes, she’s that cute.)

Have you picked up some good organizational ideas from our series? Sure hope so. If you have great ideas of your own, consider writing a post for A Learning Experience. You can learn how to submit your idea here. If we publish your idea, you score fame, publicity and a $35 School Box gift card. Woot!

2 Comments

Filed under Classroom Organization, Free Stuff!, Organization

Best Teacher Organization Ideas, Part II

by Elizabeth Cossick, M. Ed. 

Comment on this post and be entered to win a $20 School Box gift card. Just for sharing a lil’ ol’ comment. 

Every teacher knows that trying to manage a classroom without organizational systems in place is just plain foolishness. So, we’ve been compiling our favorite classroom organization ideas to share with you during this series. {To see the ingenius idea from the first post, click here.}

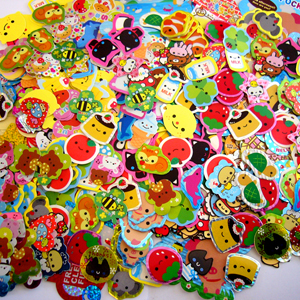
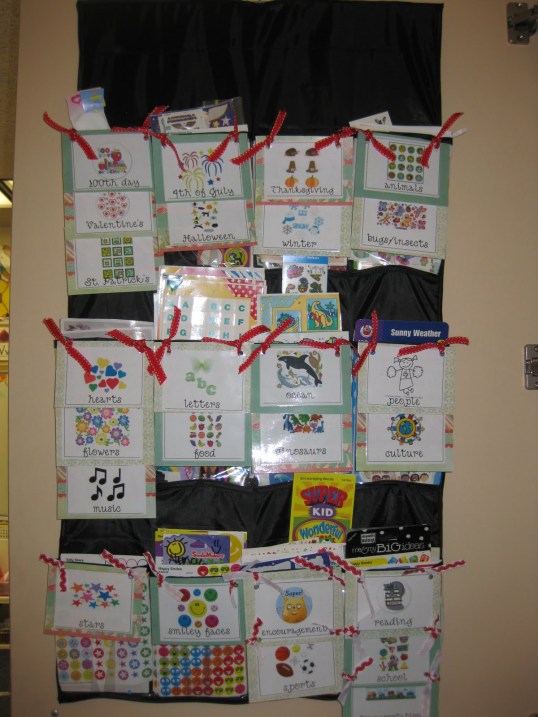
In our quest for the best ideas, we found creative uses for over-the-door shoe holders. Now these magical pocketed do-alls can be used to organize just about anything, but we loved how Miss Kindergarten (adorable blog, btw) used a shoe organizer to categorize the mountains of stickers that were taking over her classroom.

“As a Kindergarten teacher I have a ton, and I mean a TON of stickers! More and more keep popping out of random places in my room,” she says. “It was driving me absolutely nuts finding adorable stickers that I didn’t even know I had after said holiday. So I decided to face those stickers and show them who’s boss!”

Here’s her shoe organizer-turned-sticker file:

Here’s how she did it:

Step one: Tackle Those Stickers

Pile all of your stickers into one huge mountain. :)

Step two: Categorize

Organize the stickers into broad but relevant categories like encouragement, sports, Christmas, fall, culture, letters, stars, hearts, reading, and science. Once you have your piles organized, label each pile with a sticky note.

Step three: Make Cute Labels

Create labels on the computer in a cute font (one for each sticky note), mount them on construction or scrapbook paper, and laminate them.

Step four: Attach Labels

Attach labels to your shoe organizer with cute ribbon and a hole punch.

Step five: Fill the Pockets

Put stickers in correct pocket and never forget about cute stickers again!

Miss Kindergarten found her shoe organizer in the Target dollar section, but we found some pretty inexpensive versions online here and here.

Source:

www.miss-kindergarten.com

5 Comments

Filed under Classroom Decor, Classroom Organization

FRESH Bulletin Boards for Back-to-School!

by Elizabeth Cossick, M. Ed. and Diane Burdick, M.S. Ed.

Back-to-school time is upon us! Just look around any grocery store and you’ll be reminded that school will be starting up any day. So, we’re here to help you come up with a few new ways to welcome your students into your classroom–and into the new school year–with style and, well, class.

Bulletin Board #1: Getting to Know YOU

As the teacher, you’re interested in getting to know your students, but your students (and their parents) are equally as interested in getting to know all about you. So why not help them learn more about you with a YOU-themed bulletin board?

Title the board “Mrs. Smith welcomes you!” Include a brief biographical paragraph, pictures of yourself and your family, and pictures of you at the age of the students you teach. Create a list of your likes and dislikes, a list of the fun things that you did this summer, a list of your favorite things about school (it’s okay to put recess on there :).

Doing a YOU-themed bulletin board helps the students feel less intimidated by you as the new authority figure in their lives and sets the tone for a cheery new school year.

Bulletin Board #2: Look Whooo’s In Our Nest!

Owls are all the rage currently, and given their tie-in with knowledge and learning, why not incorporate them into a “Look Whooo’s In Our Nest” bulletin board?

Use strips of brown paper to create a large nest at the bottom of the bulletin board, and then fill it with owls. {Download printable owls here or here or here. Or create your own using this printable template from CraftJr.com.} Write each child’s name on an owl.

To vary this idea with photographs, ask parents to bring a fairly recent picture of their child with them to meet-and-greet or orientation (or the first day of school). Glue a child’s head over each owl face. Can’t you just picture a big brown nest filled with your new lil’ owlets?

Check out some of the great downloadable and purchasable owl items from Teacher Pay Teachers {an online marketplace for educational ideas}, too.

Bulletin Board #3: Heroes of the Class

Since hero-themed movies were so big this year in the box office, consider creating a bulletin board celebrating the different heroes in your classroom: your classroom helpers! Assign fun names and pictures to your different classroom jobs to help invoke a spirit of helpfulness, and post them to the bulletin board for all your students to see.

For example, students might not want to be on trash duty for the week, but they probably wouldn’t mind being called the Royal Rubbish Remover.

Other fun classroom helper names: 

• Inspector Desk Inspector (for the student who inspects desks for cleanliness)

• King/Queen of Calendars (for the student who helps mark things off the calendar)

• Mr. /Mrs. Clean (for the student who helps others at the sink to wash their hands)

• Professor Paper Passer (for the student who helps distribute papers)

• Agua Man/Woman (for the student who waters the classroom plants)

• “Bat” Man (for the student who helps collect sports gear)

The possibilities are almost endless! And if you have the time (and creativity), consider allowing students to wear a special pin or badge that denotes their assignments for the week. For more creative ways to display classroom jobs, check out the free resources at thecornerstoneforteachers.com.

Have fun planning out your inaugural bulletin boards!

2 Comments

Filed under Academic Success, Bulletin Boards, Classroom Decor, New School Year, Welcome

Recycled Ocean Bulletin Board {with how-to pics!}

by Elizabeth Cossick, M. Ed.

Comment on this post and be entered to win a $20 School Box gift card!

This fabulous idea was found organically (no pun intended) when my son’s pre-K class was learning about both recycling and the ocean. His {wonderful} teachers Lindsey Allman and Ariana Hull combined the two units in this uber-creative bulletin board, featuring an array of marine life made by the children out of materials pilfered from their recycling bins.

Check out the pictures below. This bulletin board is too cute not to share…and recreate!

How to build your own recycled ocean: 

The bulletin board was covered in white paper and then topped with crinkled blue cellophane wrap. Add a sandy ocean floor made out of textured scrapbook paper, white paper painted sandy tones, sandpaper, or a roll of craft paper. You could even get creative and have the children glue on dry grits: Paint white glue (thinned with a bit of water) over paper with a large brush, sprinkle on grits as you would glitter, allow to dry, dump off the excess, and hang.

The items can be attached to the board with staples, strong tape like Mavalus Mounting Tape, and/or a glue gun.

Add some yogurt-container ribbon jelly fish. The children loved painting their “trash!”

Check out the empty detergent-bottle Shamu!

Here’s how Shamu was attached…a little ingenuity, a little ribbon, and some staples. :)

How cute is this cardboard sea turtle with an egg carton head?

This empty container was inverted, painted, and given eight streamer tentacles with bead suctions. Adorable octopus!

A school of water-bottle fish is happily swimming in the corner. The bottles were cut by the teacher and their “tails” were stapled shut. The children customized their own fishies.

Some empty bottles cut into strips and painted green became seaweed. (Others were painted orange and assembled into coral.)

Paint and streamers transformed this drink bottle into a giant squid.

These three little egg carton clams may just be my favorite.

I like the idea of including a “what was learned” paragraph with the bulletin board, especially since this one is hanging in the hallway outside the classroom:

See why I had to share this idea? This bulletin board epitomizes a great culminating project: it combines two units of study, allows the children to utilize their creativity, and results in stunning student-made decor. Fabulous!

And…the class had loads of fun building this “recycled robot” out of their leftover trash:

credits:

Many thanks to Ariana Hull and Lindsey Allman with Primrose Schools for these awesome ideas. Your creativity is inspiring!

Click here for more ocean-themed activities, courtesy of The School Box.

Elizabeth D. Cossick, M. Ed. has a bachelors in education from The University of Georgia and a masters in curriculum and instruction from Lesley University, Cambridge. In addition to being the editor of A Learning Experience, she publishes Little Black Dress | Little Red Wagon Magazine. She resides in Atlanta with her husband, two young children, and a frisky Westie named Munson.

6 Comments

Filed under Activities, Art, Classroom Decor, Science, Social Studies

Happy Educator’s Day {because we’re all teachers in some way}

by Elizabeth Cossick, M. Ed.

Comment on this post and be entered to win a $20 gift card to The School Box! Winners are drawn monthly. 

January 28 is National Educator’s Day. Know what this means? It means time to celebrate YOU! Whether you’re a classroom teacher, homeschooler, Sunday school teacher, mom, dad, aunt, uncle or grandparent…you’re a teacher. Little eyes are watching you. Little hands are holding yours. Little minds are being shaped by your instruction, your example.

So, really, this day is for all of us.

As a thank you for all we ALL do to guide and inspire, we got wind that The School Box is offering special discounts on Saturday, January 28, for EVERYONE. Storewide discounts, giveaways, School Box bucks ($10 for every $50 spent, no limit)– AND free lamination on everything bought that day!

And did you know they offer free giftwrap year-round, now? Yup.

So go stock up on gifts, games and supplies for the little ones in your world. I think my birthday closet is about to get restocked. :)

1 Comment

Filed under Classroom Decor, Free Stuff!, Organization, Teaching

Pinspiration: Pinterest Finds for your Classroom

by Elizabeth Cossick, M. Ed. 

Comment on this post to be entered to win a $20 gift card to The School Box! 

So, you’ve heard of Pinterest, right? It’s a virtual pinboard where you can “keep” all of your online inspirations–from recipes to decorating pics to travel plans to–yup–teaching ideas. Here are our favorite Pinterest-found classroom inspirations…so read, enjoy, and pin to your heart’s content.

And, if you haven’t been formally introduced to Pinterest, yet, you’ll find a good article from USA Today on how to get started here.

Pinsirpiation: Look What We Found On Pinterest

Runde’s Room: The Queen of Measurement

This cute Pinterest pin, left, led us to discover the blog of teacher Jen Runde, who offers a wealth of creative teaching ideas. We love this idea for teaching the metric system by declaring yourself the Queen of Measurement– tiara included.

Mrs. Schmelzer’s First Grade: Sensational Space

The image from Pinterest, below, led us to the classroom of Mrs. Schmelzer, who’s always got a great idea up her sleeve. Love this idea for teaching the moon phases and other facts about the solar system.

One note about blogs, though, should you choose to begin one: make sure you use good judgment and secure parental online photo releases for any children you feature. You never know whose Pinterest board they may end up being pinned to….

Disney FamilyFun

This adorable paper tray, below from Disney FamilyFun, caught our eye on Pinterest. Can you believe it’s just three boxes (think: cereal boxes) taped together and then wrapped with wrapping paper? What a cute idea for art papers at a writing or crafts center!

These examples hardly scratch the surface of the fabulous ideas found on Pinterest. We’ll be sharing more of our favorites from time-to-time. We thought you might appreciate some help narrowing down the really great ideas, since it’s tough to ferret through the good, the bad and the pretty on Pinterest without losing several hours of sleep.

So rest up…and happy pinning!

9 Comments

Filed under Activities, Art, Centers, Classroom Decor, Math, Science, technology

Creating a “Where Are You?” Board

by Rachel Stepp, M. Ed. 

Comment on this post and be entered to win a $20 School Box gift card! 

Do you ever have multiple students leave your classroom at once for various reasons (clinic, library, restroom, pull-out programs, etc.), and you have trouble remembering who went where? Has the fire drill ever buzzed, and you were missing children once you were outside because they were in the library? It’s time to set up an area (or wall) in your classroom where your students can display their location. This area might look different depending on the age of your students and the places they can go on their own in your school.

Magnet Board

In grades pre-k through second, it would be appropriate to have an area that displayed each child’s picture and name on a magnet. This could be a place on the magnetic white board or on a magnetic cookie sheet hung on the wall. On this area, you will create a place for each student’s picture to be displayed under the home section. At the end of the day, every student’s picture should be moved to the home area to show that they are no longer at school. In the morning, when a child first walks in the door, he or she should move their picture from “Home” to “Classroom” to show that they are present at school on the current day. When a child’s picture is shown as in the classroom, they are to be participating in classroom activities and within sight of the teacher. This is also a visual way to take attendance, without wasting time calling roll.

Other sections that you might want to include on your board are: boys’ restroom, girls’ restroom, office, clinic, library, other. Each section besides home and classroom should only have enough room for several students at a time, depending on your classroom guidelines. For example, you might only want to allow two boys to go to the restroom at the same time. If those two positions are in use on the board, then no one else should leave the classroom to use the restroom.

Students will need to learn the routine of automatically checking the board when they walk into the classroom to make sure their magnets are in the correct location. It’s important to make sure that students know that they do not need to move their picture every time the class goes somewhere as a whole group. You can also use the same picture magnets for other activities, such as to show which center students are in during center time.

Popsicle Jars

In third through fifth grades, students might find that moving their picture around feels “elementary” to them.  When students are transitioning grades and learning a new routine for leaving the classroom, you can write each child’s name on a popsicle stick and place them in different cans/jars to show their location. The jars can sit beside the classroom door so that students can access them easily when they enter or exit the room. You can also create a simple sign-in and sign-out sheet for your students. On this sheet, they would have to record their name, the time they leave, their desired location, and the time they return. This will help you keep track of your students when they are out of the classroom and in the case of an emergency.

Hopefully these ideas will give your students some responsibility when it comes to keeping track of where they are. You are one teacher in charge of many students, and anything to make the process run smoothly is worth considering!

4 Comments

Filed under Behavior Management, Centers, Classroom Community, Classroom Decor, Organization

Creative Ways to Organize Children’s Artwork

by Diane Burdick, M. Ed.

Comment on this post to be entered to win a $20 School Box gift card!

One of the best (and worst) things about elementary school children is their enthusiasm for the new skills they master. Now that the school year is well under way — and your child’s coloring and drawing skills are better than ever before — you’ve likely amassed a large collection of artwork. While each work of art is a precious memory, you don’t necessarily have enough room in the house to store all those pictures and drawings. Instead of admiring the art for a few minutes then secretly trashing the papers when your child isn’t looking (come on, you know we all do it!), organize the collection. Here are some creative ideas to do just that:

File It

Purchase a 13-pocket plastic accordion file for each year and file the papers in the appropriate month, as a pocket-style scrapbook. Use the extra pocket in the file as a list of events over the year, a collection of your child’s sayings over the year, or information on your child’s class like the name of your child’s teacher, class photos, etc. The one, right, is cute…and available through amazon.com or schoolbox.com.

Frame It

Elevate your child’s artwork above refrigerator status. Highlight one piece of artwork from your child each week or month, and display it in a nice frame. Depending upon your child’s age and your home decor preferences, choose a place for their framed art such as in their room, in a hallway, by the front door or in the living room. Choose a fun brightly colored frame, or a clear shadow-box style so that you don’t need to worry about matching the frame to the colors on the paper.

Hang It

If your home has a more casual look, or if you don’t want the hassle of getting in and out of a frame each week or month, consider installing a clothesline-like system, where you can easily hang artwork. If you hang the line low enough, your child could even swap their art as often as she wishes. Use fun colors for the clips or clothespins and consider adding fun nobs or decorations on the clips to add even more life to the display. Here’s an affordable clothesline from The  Schoolbox, that even includes multi-colored pins: http://www.schoolbox.com/ProductDetail.aspx?ProductID=29177&CategoryID=58. (Photo from www.unplggd.com.)

Digitize It

Do you like the idea of keeping all your child’s artwork, but don’t like the idea of hanging onto all that paper? Try scanning the artwork and saving  it on a digital file. Let your child name each picture, then sort it by the season, topic, or by date your child created it. Or, take a digital photo of your child holding each piece of artwork, and save those files; this makes a cute digital scrapbook that shows not only the artwork, but also your child’s age and stage when each piece was crafted.

Another benefit of the electronic file is that you can use it as the wallpaper or screensaver for your computer. You can e-mail the artwork to long-distance relatives so that grandma and grandpa can be a part of your child’s developmental changes.

However you chose to celebrate your child’s artwork, make them a part of the process. Your attention to their creations validates their creativity and encourages your little budding artist to flourish.

Diane Burdick, M. Ed. holds a masters in elementary education and a bachelors in history, and is currently pursuing her specialists degree with a concentration in teaching and learning. A homeschooling mother of three, she also enjoys freelancing for online publications.

Article edited by Elizabeth Cossick, M. Ed.

1 Comment

Filed under Art, Classroom Decor, Organization