Monthly Archives: April 2011

Daffodownlilly

by Kelli Lewis

Comment on this post to be entered to win a $20 School Box gift card. Winners are drawn each month!

This springtime activity is perfect for the classroom or the kitchen table! It incorporates a poem and a craft…and could even be a great Mother’s Day gift.

Read A Poem

“Daffodowndilly” by A. A. Milne

She wore her yellow sun-bonnet,

She wore her greenest gown;

She turned to the south wind

And curtsied up and down.

She turned to the sunlight

And shook her yellow head,

And whispered to her neighbour;

‘Winter is dead.’

Create a Craft

Photo of daffodil craft from http://www.dltk-teach.com.

This wonderful craft idea came from DLTK’s Educational Activities website: www.dltk-teach.com.

Materials for each Daffodil:

– a cardboard egg carton cup

– yellow paint

– glue/tape

– green construction paper (or a green straw)

– yellow and green cardstock paper (or use white and allow your students to color or paint the pieces)

Procedure:

• Cut out the flower shaped piece and two leaf-shaped pieces from the yellow and green (or white) cardstock paper. You may want to do this part beforehand for your students, depending on their age.

• Color/paint the pieces, if you chose to use white paper.

• Roll a sheet of green construction paper as tight as you can to make a tube, then glue/tape it so that it stays together (or you can just use a green straw).

• Flatten the tube a little.

• Glue/tape the leaf pieces to the flat part of the tube, somewhere in the middle of the tube.

• Glue/tape the flower piece to the top of the tube.

• Trim the edges of your carton cup if it is jagged.

• Paint the carton cup yellow, including the inside! (You can use styrofoam if you don’t have cardboard, but you will just have to leave it white since the paint doesn’t stay very well on styrofoam.)

• Glue the egg carton to the center of the flower piece.

After making sure everyone has their name on their daffodil, you may want to put all of them in a large vase for display in the classroom!

Extra facts you may want to share with your students…

Did You Know?

  • The first day of spring is special because daylight and darkness both last for 12 hours.
  • Spring is a time when we have many flower festivals here in the United States. In fact, Washington, D.C. has a yearly Cherry Blossom Festival when visitors come to see flowers and enjoy our beautiful capital. You could also research local flower festivals in your town or state on www.topeventsusa.com.

 Kelli Lewis is graduate student at the University of Georgia and a regular contributor to A Learning Experience.

2 Comments

Filed under Activities, Art, Poetry, Seasons

Make Way for Ducklings!

by Kelli Lewis

Comment on this post and be entered to win a $20 School Box gift card. Winners are drawn every month!

Quack, quack! Here is a fun activity for kindergarten or first grade. Get your students involved and engaged as they become immersed in this beloved story and cute craft activity.

Read Aloud

  1. Read Make Way for Ducklings by Robert McCloskey.
  2. Use this time to review concepts you’ve been working on prior to this activity. For instance, ask students to identify the story’s problem and solution, make predictions, point out compound words or proper nouns, etc.
  3. Then, follow up the story by making your own ducklings!

Duckling Craft

Materials for one duckling:

• paper plate

• yellow crayon

• black crayon

• stapler

• yellow construction paper

• orange construction paper

Materials to have pre-made or pre-drawn so that the students can cut out (for one duckling): 1 orange duck foot (start by drawing an egg shape, then make the top part spiky for the toes), 1 small orange nose (triangle), 1 yellow duck head (circle).

Instructions:

• Fold paper plate in half and staple.

• Color both sides yellow with a crayon.

• Trace your hand on a piece of yellow construction paper and cut out. This will become your duckling’s feathers.

• Draw two black eyes on the duckling’s head (yellow circle).

• Glue the orange nose (triangle) on the duckling’s head (yellow circle).

• Glue the duckling’s head to one pointy end of the duckling’s body (folded paper plate).

• Glue the duckling’s feathers (yellow hand print) to the other pointy end of the duckling’s body (folded paper plate).

• Glue the orange foot (egg shape with spikes) to the bottom of the duckling’s body (folded paper plate), in the middle of the curve.

Writing Tie-In

To incorporate writing, depending on level:

  • Students can write their names on their ducks
  • Students can write one sentence on the back of their ducks, describing their duck with adjectives (“My duck is yellow.” “My duck is cute.” “My duck is fluffy.”)
  • Advanced students can write a paragraph about their duck on a separate piece of paper, which can then be glued inside the duck’s paper plate body. To get them started, ask these prompts: What does your duck eat? What does your duck look like? What does your duck do for fun?

The cute little ducks will surely “quack” up your students!

This classic book is often available in libraries, but if you’d like your own copy for $7.99, click here.

Kelli Lewis is a graduate student at The University of Georgia and a regular contributor to A Learning Experience.

1 Comment

Filed under Activities, Art, creative writing, Reading, reading aloud, Writing

Comment winners for March!

We have TWO comment winners for the month of March! These winners were randomly drawn from among everyone who commented on A Learning Experience posts last month. To get your name in the hat for April’s drawing, go comment on some current articles! It’s a fun way to share ideas…and a great way to potentially score $20 to The School Box– our favorite place for teacher goods, kiddie games, birthday presents, art supplies and all that jazz.

March Comment Winners!

peggy hernandez

Submitted on 2011/03/03 at 3:39 pm

Cute BB idea. The leprechaun always visit our classroom on March 17th. He turns over chairs, breaks things, leaves gold glitter all over and leaves us a piece of gold on our desks. My children are already talking about the “leprechaun visit” this year. I’m happy that most of my 2nd graders are so sweet and innocent! I love St. Patty’s Day!

Ashley

Submitted on 2011/03/30 at 9:26 am

LOVE this idea! I have already printed it out and will be purchasing my supplies very soon! We will be making these for grandmothers too! Thank you so much for sharing!

Congrats, Peggy and Ashley! A $20 gift card to The School Box is on its way to both of you.

Comments Off on Comment winners for March!

Filed under Teacher Inspiration, Teaching

Creative Spring Door Art!

David Ottogalli Peep Artwork

by Rachel Stepp

Comment on this post to be entered to win a $20 School Box gift card! Winners are drawn monthly.

Welcome spring into your classroom with these fresh ideas!

This time of year, baby animals are hatching and being born, flowers are blooming, and butterflies are flitting through the air. You can bring the wonders of the season into your classroom…on your classroom door! Here are two attention-getting ideas:

You Crack Us Up

1. On your door, create the phrase “You Crack Us Up!” with colorful lettering.

2. Have your students design and color construction paper eggs that are about the size of the paper (8 x 10). After each student has created their egg, have them cut the egg in a zig-zag pattern across the middle.

3. Attach the two halves of the egg together with a brass brad so that the egg can open and close. Attach the bottom half of the egg to your door and leave the top half unattached so that it can move.

4. Now here’s the cutesy custom part! Take each student’s picture while they are laughing. Once you have everyone’s picture, put each student inside their egg so that when you open the cracked egg, you see their laughing faces. Your students will truly enjoy seeing themselves and their peers with smiling faces!

5. To incorporate writing, have your students write jokes for their eggs. For a slew of clean knock-knock jokes, your kids can visit this site at the library, during computer lab time, or at your classroom computers: http://www.brownielocks.com/knockknock.html. Once they pick a joke they like, the first half of the joke can be written on the outside of the egg, and the punchline can go inside the eggs by their laughing faces. Your door will become your school’s favorite place to get a good laugh and spread smiles!

Peep Into Our Room

1. First, cut out a piece of bulletin board paper the to fit your door. Don’t attach it, yet, though. Then, create the phrase “Peep into Our Room!” to encourage visitors to come and explore what you are learning. With the paper lying on the floor or a table, glue the letters on the paper.

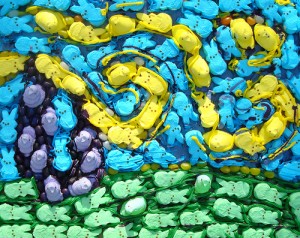
Starry Night by CakeSpy

2. Now, to make this door spectacular, students will glue marshmallow Peeps all over the paper in designs like flowers, stripes and patterns. The real Peeps will be irresistible to students, and they will catch everyone’s eye! This idea is from the Official PeepsShow where artist David Ottogalli creates “Peep art” using these marshmallow treats.

3. If you don’t think the Peeps will survive on your door, you can cut peeps out of construction paper. There are two basic designs, bunnies and chicks. Your students can then create patterns and designs with their cutouts.

These ideas will keep your door covered and creative throughout spring. And, before you know it, it’ll be time to create end-of-the-school year doors!

For a colorful spring bulletin board/door border, check out this floral beauty from The School Box: www.schoolbox.com.

Rachel Stepp is a graduate student at the University of Georgia and a wealth of creative ideas!

3 Comments

Filed under Activities, Art, Classroom Community, Classroom Decor, Seasons, Writing

Spring is in the air…all around the globe!

adapted from ideas submitted by Kelli Lewis

Comment on this post and be entered to win a $20 School Box gift card! A winner is drawn monthly!

Want to incorporate multiculturalism into your lessons this spring? Why not take an imaginary trip around the world and visit another country, in your very own classroom?

Introduction

Ask students: Do you want to journey on an imaginary trip to Vietnam to participate in the Chu Dong Tu Festival? Or what about to India to visit the festival of Holi? That’s what we’ll be doing today.

Background Research

What are some things that any festival typically includes? (decorations, food, activities and games, etc.) If you were going to help prepare for these two festivals in India and Vietnam, what would you need for your trip? Allow students to research these events and countries to create a supply list for their trip. What will the weather be like in the country on your day of travel? How should you ‘pretend pack’ your bag in order to prepare?

Vietnam:

In Vietnam during the Chu Dong Tu Festival (which celebrates one of the four Vietnamese “immortal heroes”), girls wear traditional dresses and hats, and then they act out a story.

1. Read aloud a story about Vietnam and allow student volunteers to act it out as you read. This is very engaging…and also encourages adept listening ears! Here are a couple favorites:

Grandfather’s Dream, by Holly Keller. A warm tale that takes place in a rural Vietnamese village.

The Lotus Seed, by Sherry Garland. A hopeful tale about a Vietnamese refugee, told by her granddaughter.

2. An alternative spin on acting out a tale is to allow students to act out traditional American tales (which they all know). First, write the names of several common stories (like fairy tales) on strips of paper. Arrange students into groups of four and allow each group to draw a story strip, which they will then act out. Give each group about 30 minutes to prepare ideas, and then have them act out their “skit” for the class. They are guaranteed to be silly…but lots of fun!

India:

India’s festival of Holi is a celebration of colors! During this exuberant and blissful spring festival, participants dress in old clothing and toss colored powders and colored water into the air, rubbing the colors into their clothing and skin, as a celebration of good and light over evil.

1. Allow students to bring in old clothes, preferably light colored (some old white shirts from Dad work great!). Or, ask for old light-colored sheet donations, and cut them into makeshift tunics for your students.

2. Get permission from the administration first, and then find an area outside (like an empty parking lot or grassy area). Give each student a small cup filled with colored water (just a drop of food color mixed in a cup of water should do fine…you don’t want too much!). Then, they can throw their water up into the air, so it rains down colors…just like in India! Using dried, colored grits (add food color to dry grits) is another idea for something colorful (but biodegradable) they can throw.

3. Of course, throwing colors is messy (although the children LOVE it!), but if neater is more your speed, you could opt for colorful art, instead. Students can finger paint and “splatter” paint with water colors on white paper by flicking their brushes. They can also use colored dry grits to create collages by drawing a design on paper, adding glue, and then sprinkling the colored dried grits onto the glue.

4. Then, students can hug each other and say “Happy Holi!”–ushering in the warm spring weather, India-style.

2 Comments

Filed under Activities, Art, Classroom Community, Multicultural Community, Reading, Seasons

The {Very} Hungry Caterpillar

by Kelli Lewis

Comment on this post to be entered to win a $20 School Box Gift Card! A winner is chosen every month.

Here’s how to use this classic tale by Eric Carle with Pre-K and Kindergarteners to review sorting, beginning sounds, counting, transformation from caterpillar to butterfly, and making connections to the story.

Before participating in the activities below, begin by reading The Very Hungry Caterpillar by Eric Carle.

1. Sorting

Provide items that are included in the book, such as apples, pears, strawberries, watermelon, pickles, lollipops, etc. I suggest that you use plastic items or some type of pre-made laminated cards. Allow students to sort the items together with ones that match the other. For instance, group all of the apples together, all of the pears together, etc. For students who need more advanced tasks, challenge your students to group them together using other attributes, such as size, color, shape, taste (sour, sweet, etc.), or even by seeds and no seeds or healthy and unhealthy.

2. Beginning Sounds

The hungry caterpillar eats different items on each of the days of the week. You can use this activity to review calendar concepts and days of the week. Have students try to remember what the caterpillar ate each day. Use the book to look back and find out or check with their guesses. Then, have students help you write two sentences for each day. The first one will state what he ate on that day, and the second one will list other foods that start with the same letter as that food. For instance: “He ate an apple on Monday.” You would write this very sentence. Then, students would try to think of other foods that start with “a” since apple starts with “a”.

3. Counting

Look back at the book. How many apples did he eat? (one) How many pears did he eat? (two) How many plums did he eat? (three) How many strawberries did he eat? (four) How many oranges did he eat? (five) And how many desserts did he eat? (ten!)

4. Metamorphosis

The hungry caterpillar made a cocoon around himself and went to sleep. Two weeks later, he woke up, and what did he turn into? Discuss this process, called metamorphosis, with the students and allow them to make a butterfly using paper and tissue paper pieces to make it colorful.

5. Making Connections

The hungry caterpillar eats many foods on his way to becoming a beautiful butterfly. What do you eat when you are very hungry? Have students write a sentence with the foods they eat when they are very hungry (“When I am very hungry, I eat ____.”), and then draw a picture to match their sentence.

To view a really cool Very Hungry Caterpillar board game, click here!

These creative ideas were shared by Kelli Lewis, a graduate student at The University of Georgia.

4 Comments

Filed under Activities, Art, Centers, comprehension, creative writing, Games, Math, Phonics, Reading, Science, Writing

The Little Red Hen {awesome activities!}

by Kelli Lewis

Comment on this post and be entered into our monthly drawing for a $20 School Box gift card!
Here is a fun activity to submerge your kindergarteners or first graders in this memorable story favorite. They’ll participate in their own writing and bring the story to life through an adorable craft. Just in time for spring…and perfect for the classroom or at home with your own kiddos.

Start by reading The Little Red Hen by Paul Galdone.

This is the classic folk tale version most of us are familiar with (and it’s available at The School Box for $5.95 if your library doesn’t have it). Use this time to review concepts you’ve been working on prior to this activity. For instance, ask students to identify the story’s problem and solution, make predictions as you’re reading, point out compound words or proper nouns, etc.

Next, watch The Little Red Hen on video.

I found this on youtube.com, but you may or may not have permission to show this in your classroom. However, I would bet there is a way you can get this from your school media center or the local library, since it’s such a popular video. Here’s the youtube link: http://www.youtube.com/watch?v=zr-yQGD9eAA

Connect and write about it.

Have students write sentences about how they help out around their homes: “I help at home when I ________.” Then, they can draw a picture to show them helping.

Bring your story to life with a craft!

This hen is pretty easy to assemble and fun to create. I like using the hen template found here: http://www.first-school.ws/t/craft/hen_c_craft.html. However, by taking a look at it, you could easily get your own ideas for making a hen.

Make it scrapy! Using scrapbook paper for the hen’s feathers/arms makes these little guys absolutely adorable. Check your local Hobby Lobby or any other crafty stores for a variety of scrapbook paper with all different sorts of prints. These places usually have a section of discounted papers you can sort through, if you’d like. Cooking-themed and farm-themed papers repeat the story’s themes, but red-and-white checkered paper is super cute, too.

Who’s down for an extension?

After reading this version of the Little Red Hen, children get really tickled by reading different versions.  Check out The Little Red Hen (Makes a Pizza) by Philomen Sturges, with its modern, wacky twist. Then, talk about how the two stories are similar, and yet also different.

So, who’s going to go try these activities? And none of you had better answer, “Not I”!

For more Little Red Hen ideas, including a felt board set and a Big Book, click here.

Kelli Lewis is a graduate student at The University of Georgia whose creative ideas are always inspiring!

3 Comments

Filed under Activities, Art, comprehension, creative writing, Language Arts, Reading, reading aloud, reluctant readers, Writing